Hearing Aid Receivers: Then and Now — What You Need to Know in 2025
If you’ve ever had a hearing aid stop working, you know how frustrating it can be. The good news? Most of the time, the fix is simpler than you think — and often, it comes down to one little part: the receiver.
In this post, we’ll walk you through what a receiver is, how changing it has evolved over the years, and what you can do today to troubleshoot your hearing aid like a pro.
The Old Days: When Changing a Receiver Was a Big Deal
Back in the day, replacing a hearing aid receiver wasn’t just tricky .. it was practically a surgical procedure. The receivers were attached with tiny pins that had to be carefully pulled out, often under a microscope.
If you dropped a pin (and trust us, it happened a lot!), you had to keep a supply on hand because those little things were so easy to lose. Most people couldn’t do this on their own, so they would come into the clinic for every receiver change. It was time-consuming, frustrating, and definitely not DIY-friendly.
Fast Forward to 2025: Quick & Easy Changes
Thankfully, times have changed! Today’s hearing aid receivers are designed for simple, tool-free (mostly) replacement. At our clinic, we still see people every single day who come in with a bad receiver, but the process to fix it is a breeze compared to the old days.
Here’s how we approach it when someone calls and says, “My hearing aid isn’t working.”
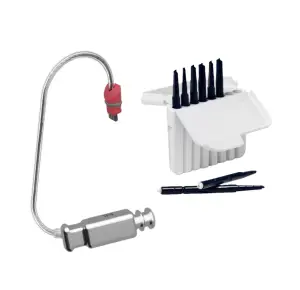
Step 1: Check the Wax Guard
Our first question is always, “Did you change the wax guard?”
Wax guards are tiny filters that prevent earwax from blocking the receiver. If your hearing aid suddenly stops working, a clogged wax guard is often the culprit.
Sometimes, people forget to change it or aren’t sure how. That’s okay.. it happens! But it’s always worth checking first because it’s the easiest fix.
Step 2: Swap the Receiver
If the wax guard looks good and your aid still isn’t working, the next most likely issue is the receiver itself.
Most of the time, changing the receiver solves the problem immediately.
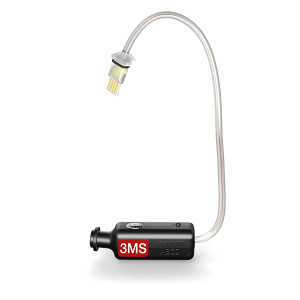
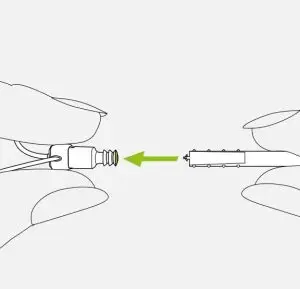
Modern receivers are simple to replace:
- Gently pull the receiver from the top of the aid — it should slide right out.
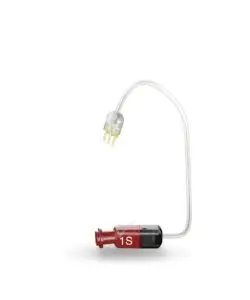
- Check the size number on the silver part of the receiver (the “speaker”).
- If you can’t read it, don’t worry!
- Contact our clinic and we can look it up for you.
- Or send us a picture, and we’ll help figure it out.
- If you can’t read it, don’t worry!
- Pop in the exact same size and brand receiver, and you’re good to go!
Pro Tip:
Red = Right ear
Blue = Left ear
When to See a Professional
If swapping the receiver doesn’t fix the issue, it’s time to bring your hearing aid into the clinic. At that point, there may be a more significant issue that needs professional troubleshooting.
Also, if you feel like your receiver isn’t powerful enough, don’t just swap it for a bigger one. This could cause more harm than good. Instead:
- Have your hearing aid reprogrammed for your needs.
- Or talk to us about upgrading to a more powerful receiver.
This is something only a professional should handle to ensure the best fit and performance.
Know Your Brand and Model
One important thing to remember: you must use the correct receiver for your hearing aid brand and model.
There are many versions out there, and it can get confusing — even for us sometimes!
A few current examples:
- Signia AX and newer hearing aids use V3 receivers.
- Resound One and newer models use SureFit 3 receivers.
We’ve listed which receivers go with which products on our website, but if you’re unsure, just ask. We’ll help you figure it out.
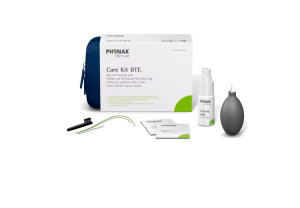
Extra Supplies and Tips
At our clinic, we offer:
- Bundle deals on receivers and wax guards.
- A wide selection of domes/tips — just send us a picture, and we’ll match it to your brand.
- Exclusive member pricing, so you don’t need to run to Costco for maintenance anymore. You can do it yourself — and even better!
Important:
Don’t mix and match tips or receivers across different brands or models. Always use the exact match for your hearing aid.
DIY Made Easy
If you prefer to see the process step-by-step, we’ve got you covered:
- Check out our how-to videos on our YouTube Page.
- Or simply search YouTube for your hearing aid brand and model — there are tons of helpful tutorials.
- Still stuck? Let us know, and we’ll make a custom video just for you.
The Bottom Line
A non-working hearing aid doesn’t always mean an expensive repair.
More often than not, the fix is as simple as replacing a wax guard or receiver. With today’s easy-to-change parts, you can handle most minor issues right at home. We’re here to help every step of the way.
Your hearing matters, and we want to make sure nothing gets in the way of you hearing your best.
Hearing Aid Receiver & Wax Guard Compatibility Table
|
Brand |
Model / Series |
Receiver Type / Accessory |
Wax Guard Type (Receiver Only) |
Key Notes |
|
Audéo Lumity, Paradise, Marvel |
Phonak CeruStop |
Standard receivers; choose correct size and power. |
||
|
Latest Infinio receivers. |
||||
|
MAV (Paradise ActiveVent) |
Phonak CeruStop |
Includes special SlimTip adapter. |
||
|
Signia/Rexton 3.0 Receiver |
Signia/Rexton 3.0 Wax Guard |
Compatible with newer RIC models. |
||
|
LiNX 3D, Quattro |
ReSound SureFit 2 Receiver |
Older models; replace regularly. |
||
|
ReSound SureFit 3 Receiver |
For newer RICs up to 2025. |
|||
|
ReSound One M&RIE |
ReSound M&RIE Receiver |
ReSound M&RIE Mic Filters |
Built-in mic—use specific filters. |
|
|
Dream, Unique, Beyond, Evoke, non-rechargeable Moment, Magnify |
Sizes 0–4; power S/M/P. |
|||
|
Widex V2 (EasyWear) Receiver |
Sizes 0–4; power M/P. |
|||
|
Livio AI/Edge, others RIC series |
Starkey SnapFit (Original) Receiver |
Sizes 1–5; universA wax guard packs. |
||
|
Starkey SnapFit 2.0 Receiver |
Includes wax guards for new models. |
|||
|
Discover Moxi, North, Tempus (3-prong) |
Unitron 4.0–5.0 Receiver |
Unitron CeruStop (shared infrastructure) |
Comes through Sonova network. |
Why Wax Guard Compatibility Matters
- Receiver wax guards are distinct from wax guards used on custom molds.
- Each wax guard is designed for specific receiver geometries and acoustic pathways.
- Using the correct wax guard ensures optimal sound delivery, prevents clogging, and helps maintain receiver longevity.
Essential Accessories
|
Accessory |
Purpose |
Compatibility Note |
|
Prevent earwax from clogging the receiver. |
Must match the hearing aid brand and model. |
|
|
Secures SlimTips onto Phonak MAV receivers. |
Used exclusively with Phonak ActiveVent receivers. |
|
|
Retention Locks |
Keep the receiver securely in the ear for better stability and comfort. |
Each retention lock is brand- and model-specific—not cross-compatible. |
Why Retention Locks Matter
Retention locks are small, flexible arms that sit inside your ear canal to hold the receiver in place, ensuring a comfortable fit and consistent sound quality.
- Without them, receivers may slip or move, causing feedback or poor sound delivery.
- Since each receiver has a uniquely shaped retention lock, you must use the correct lock for your receiver’s brand and series.
Why This Table is Helpful
- Quick reference for identifying the correct receiver or accessory for every major hearing aid brand.
- Prevents mix-ups, especially with similar models across brands like Phonak and Unitron.
- Supports both clinicians and DIY-savvy users in making confident replacements at home.
Highlighted Accessory: Phonak SlimTip Link AV
A small but essential accessory for MAV receivers, the SlimTip Link AV is a clear adapter that secures the SlimTip to the MAV’s end. While it’s subtle, replacing it requires care and precision, something many users can handle with guidance or a quick tutorial. You may use it on two different Receivers by Phonak–5.0 or 6.0.
Why This Table Matters:
- Quick reference for staff and clients to accurately match hearing aid models with the correct receiver or accessory.
- Supports DIY fixes: replacing wax guards or receivers at home becomes simpler and safer.
- Prevents errors like ordering the wrong part, especially with similar lines across brands.